Bonus Stage 1
Survive 50 waves of open-terrain warfare. Use your turrets to block oncoming units and create paths.
The bonus stages take a significant departure from the campaign and the general strategies used there to a significant degree with allowing you to actually maze the enemy with your own turrets. Unfortunately, even though you are presented with a wide amount of space, you will still need to be somewhat conservative with maze design in order to make the most out of your funds.
This guide will cover how to get a Full House, which is a perfect round with all medals, on the Bonus Stage 1 level of the iBomber Defense Pacific campaign, played on Veteran difficulty. In addition, this mission guide will also cover the secondary objective along with a walkthrough video.
An Overview
Here in the first bonus stage, you are not only presented with a totally new concept to iBomber Defense. Creating your own mazes becomes a necessity, at an already challenging level of difficulty considering the waves you’ll face. It helps to have played other mazing tower defense games for these bonus missions, however if you have, keep in mind that iBomber Pacific’s strategies continue to apply here: carefully spending every dollar and only using a small portion of the overall space you have to maximum effect.
Secondary Objective
Gather all the supply crates in the area.
There are a fair bit of crates evenly spaced on the battlefield, a couple of which you’ll need to remove for your own turrets to be placed later. These will all be easily handled with a couple of bomb turrets.
Supply Crates: 8
Your perks and upgrades do not carry over to the bonus missions, although you will have all turrets available at max level. Either way, do not worry about your victory points or what not here. Those only apply to the campaign missions.
Visualizing Your Maze
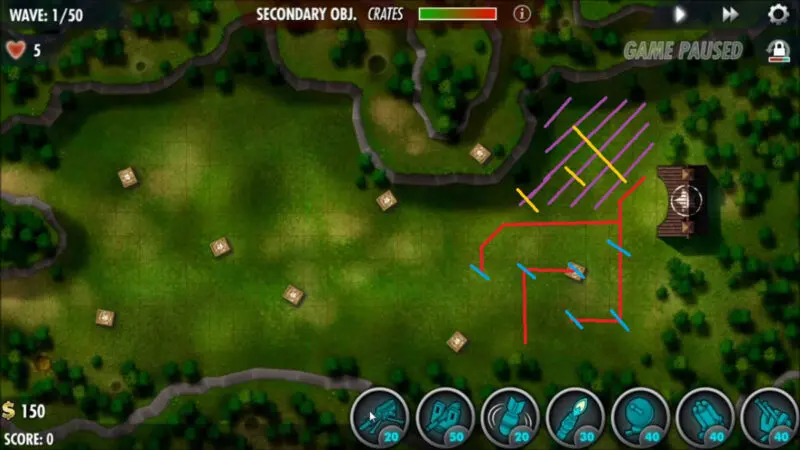
The first step to success on veteran difficulty is to draw out or visualize the maze you will use, which can be easily done in paint if you want to come up with your own design, or alternatively saved from one of the images in this guide if you plan on following the maze I created here. This helps A LOT, especially having said image open in a window while you play the game, or at least sketched on a piece of paper. It can be easy to lose track of what turrets go in which spaces considering the mostly featureless terrain, and mistakes can prove costly.
One painful part of this mission—and the reason you have to have your plan set in concrete before attempting the full house—is that when things do go wrong, they usually only manifest into unstoppable problems in the last few waves of this level, when you are faced with hordes of super armored tanks, even if the mistakes were made very early in the level. Considering the length of the level itself, sitting at around 30 minutes with fast-forward active most of the stage, you’re saving yourself a lot of time in the long run as well.
Turret Placement and Maze Design
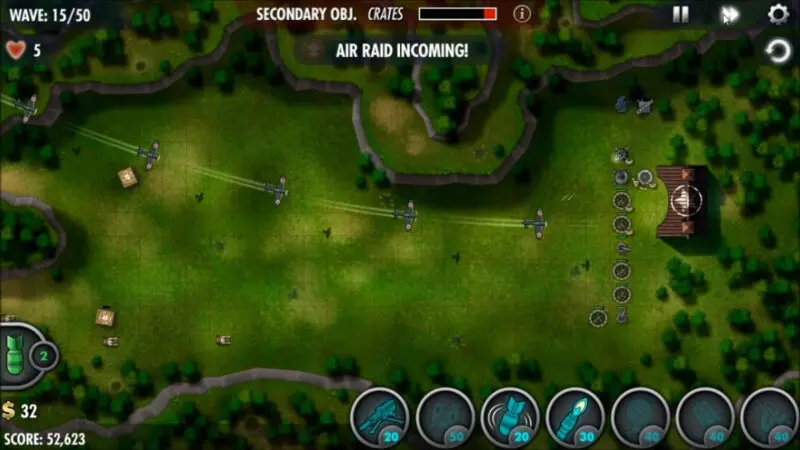
This mission can be split into two distinct stages based on the overall strategy you are following at each given one, more or less divided evenly between the first and last 25 waves. Starting off, you should build the first line of turrets as seen in the picture to the right, to start taking out the early waves, with a bit of money left over for a bomb turret to work on the crates. There will be one crate currently close enough to be worked over by your turrets a bit in between waves, which can eventually be finished by a single bomb if not with the turrets themselves.
The First 25 Waves

Wave 1 Wave 10
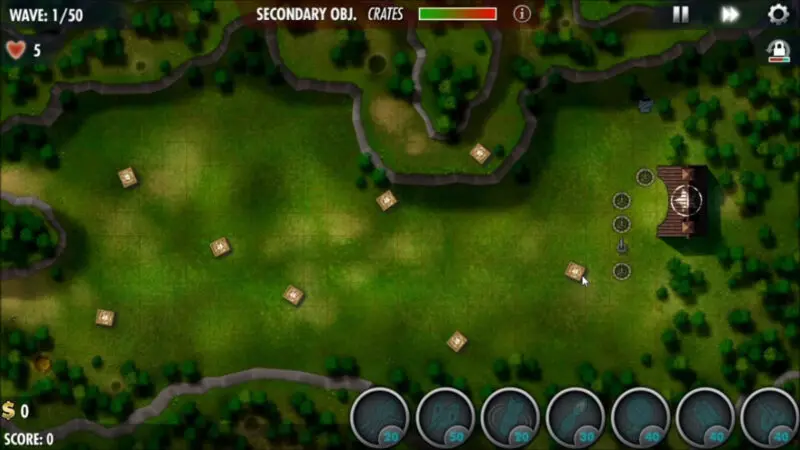
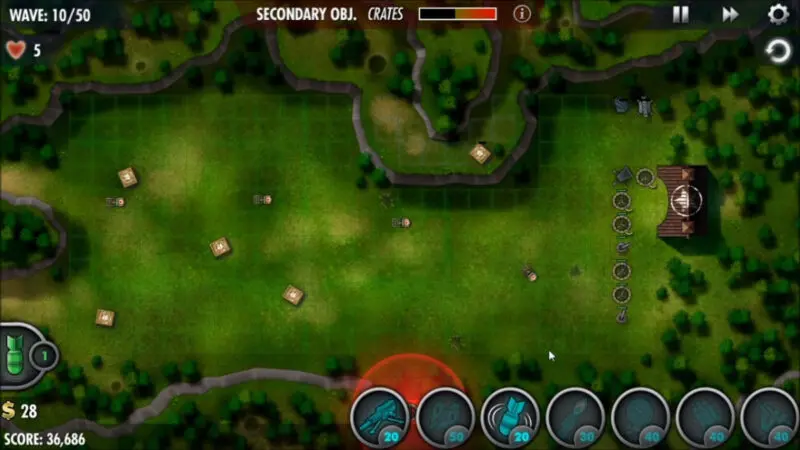
The first half of the mission, turret-building-wise, will require being as conservative as possible with your spending, getting a pair of Bomb turrets (one level 3 and one level 2) to break open crates ASAP, and starting to work towards 4 fully upgraded comms towers with about 200 credits saved around the time you hit wave 25. Upgrading and digging in the MG turret closest to your base will help with defense, along with the first comms being placed close enough to boost the top bit of your wall. AA placement is covered separately below.
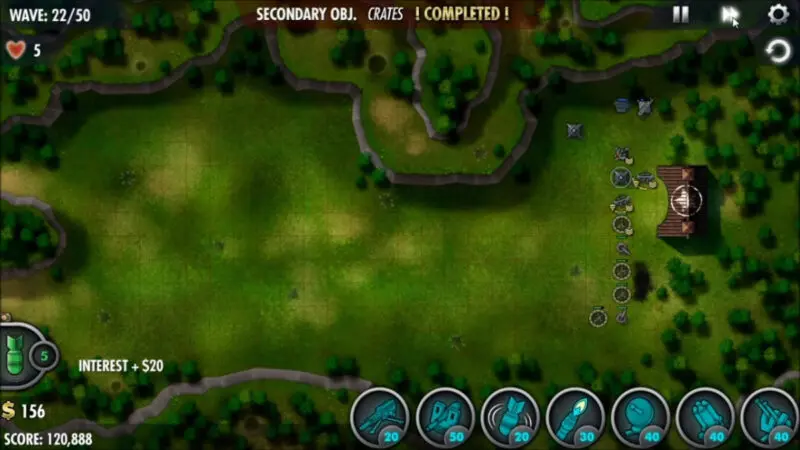
As you finish off the last of your crates, you will want to start reserving as much of your money for those comms while using the bombs you will now have as spares to weaken the enemy waves. This allows you to put off further funding for the wall and your actual damage-dealing turrets. Further below you can find a “safety zone” box drawn in one of the pictures, where you can safely drop bombs close to your final stretch line, without hurting your turrets: a good emergency procedure for potential leaks. You will likely have very little room for error as most enemies will die right before taking your lives, but the closer you can let them get while saving money for those comms, the better off you’ll be at the end of this mission.
Finally, make sure you are always earning interest. For example, by saving the money you earned from the current wave, that you’re about to spend on turrets, until your interest payout comes at the very beginning of the next wave, and never zeroing out your balance unless absolutely necessary.
Wave 15 Wave 22
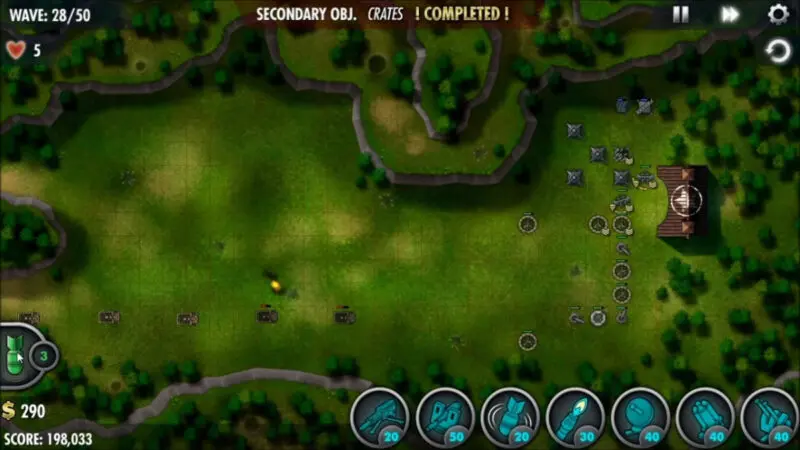
The Last 25 Waves
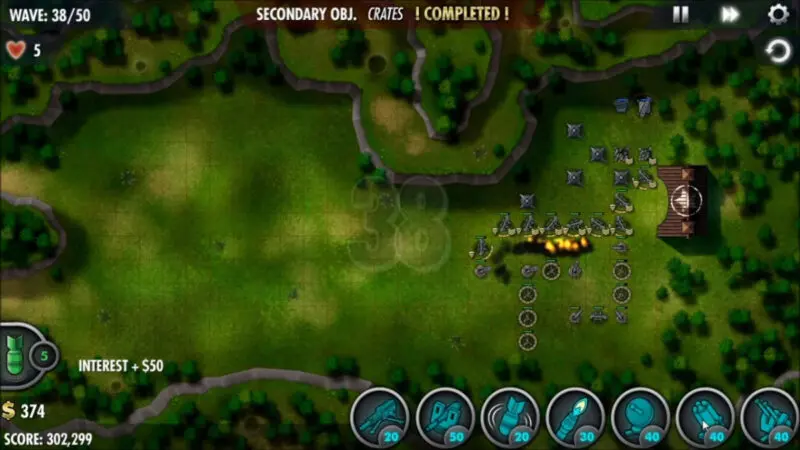
Wave 28 Wave 38
This stage may last more like 30-25 waves, depending on how you progressed exactly, but it begins when you are earning max interest, with 4 level 3 comms and about 180-200 in the bank at the end of every wave, so that you’re earning the maximum of $50 in interest for every following wave. Remember to never spend yourself lower than this point so you always have that extra $50, potentially spending a bit more if you get more comms and thus, a higher interest rate later on.
Start pumping all of your funds into that maze now, forming the remainder of the MG/Flamer wall and focusing on upgrading and digging in the top line of turrets, along with others that can get prolonged coverage over the central and entry parts of the maze with their fire arcs. Leave the MG turrets in the center and lower parts of the maze un-upgraded until later, except for the ones which are taking damagem since upgrades will give them more hp and a reduced repair cost overall. The Flamers will need to be prioritized towards their third levels, however, since they mean more time the enemy has to spend in the more deadly areas of your maze.
Once the wall is up to snuff, you can start filling in your squishy zone, which is the box drawn in purple in the visualization map above. This is a big part of maze design as well, since these turrets should all be safe from enemy fire and the costly repairs that brings. Your best bet is hordes of level 3 Rocket Turrets, dug in so that they can cover the point of entry into your maze along with the very edge of their fire arc, and the rest of their arcs spilling in towards the center of the maze. A couple Cannons, placed to the back of the safe zone and dug in with their extreme range, can be handy as well, but more than two are ill-advised, since they take away from rocket funds which are sorely needed here.
From here on out you should be fine as long as the first half went well for you, since that’s where the difference is really made. There are a few more important bits to take note of, however, mentioned below.
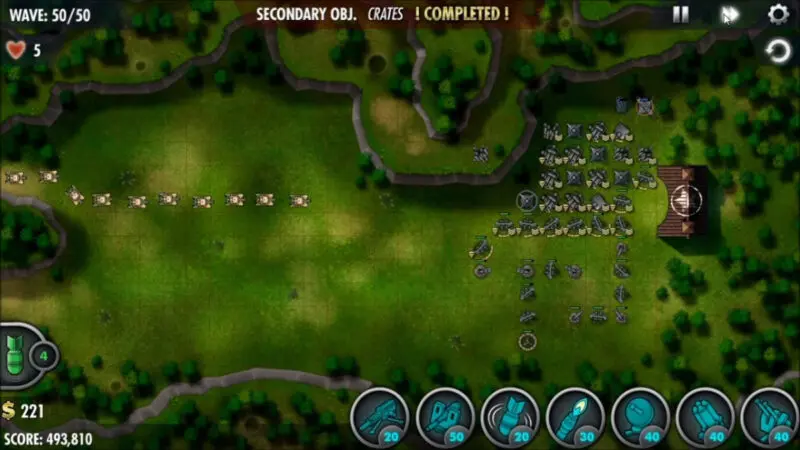
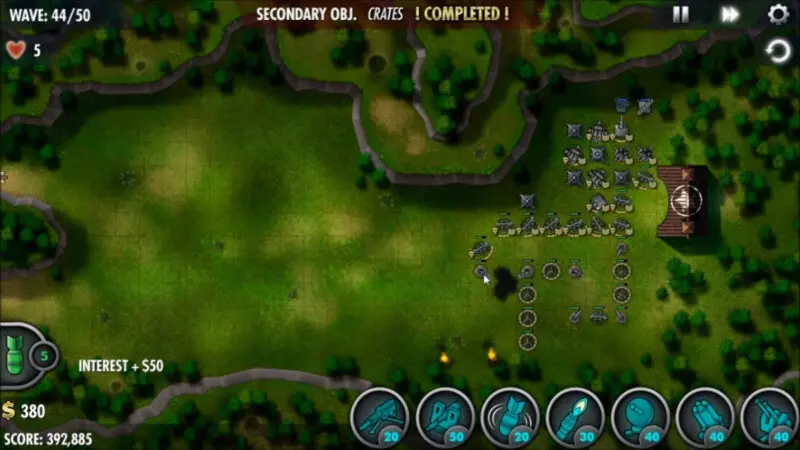
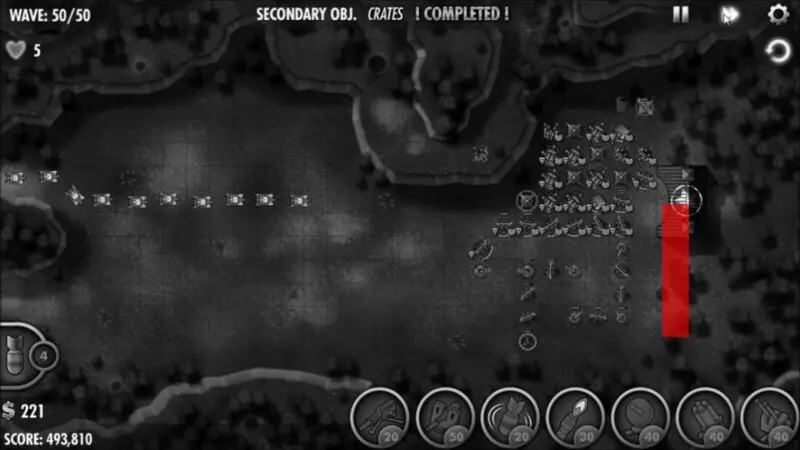
Wave 44 The maze at its final stage at wave 50.
Anti Air
Here is the exact rate at which you can build your AA to conserve as much funds for interest and all the other turrets you’ll need. These turrets should be placed in the squishy zone or on the right edge of the high ground, where they can get good coverage of incoming aircraft while potentially also receiving boosts from comms. Try to also get the AA you need in the wave prior to the one in which you actually need it to make sure you have enough funds; rewinds won’t save you from this problem if you begin the wave with too little money.
Before Wave 15: First air wave, you’ll need 1 turret at level 1 here (comms boosted).
Before Wave 20: Upgrade your first AA to level 2.
Before Wave 26: Upgrade to level 3.
Before Wave 30: Second AA built @ level 1 (comms boosted).
Before Wave 42: Second AA upgraded to level 3.
Before Wave 45: Third AA built and at level 3 for good measure.
The Bomb “Safety Zone”
One important part of this stage is being able to use bombs in an emergency to weaken enemies which are about to take a life from you, or look as though they may. Right next to the final stretch of their approach where you first started your maze, there is a safety zone where you can drop bombs in order to damage nearby enemies while sparing your turrets from much of the damage and associated repair costs.
Repairing your Turrets and the Heat Map
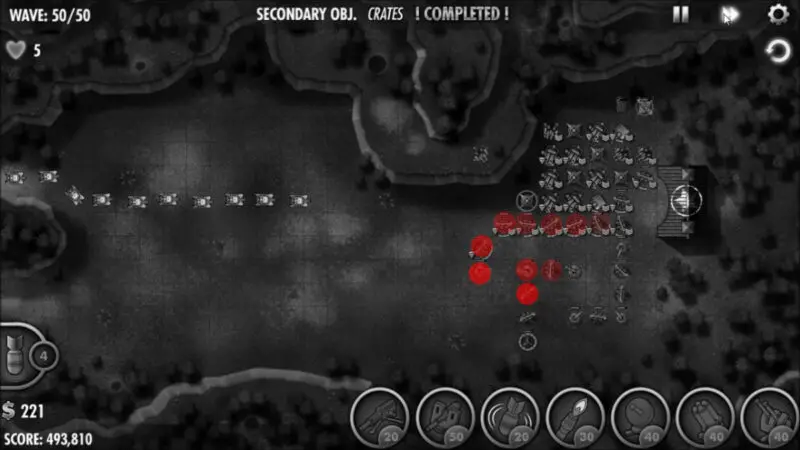
The picture here is a heat map showing which turrets in the fully built maze will be taking the most damage, thus demanding your utmost attention to keep up with repairs so you can grab that survivor medal. While your turret maze will only look like this in the final half, it is that last part of the level where the damage really kicks up to immense levels. The rate at which damage comes in also means it is best to take the game off fast forward, since when sped up, the explosions have a way of really occluding the health bars and damage indicators of your turrets.