Coral Sea: Sea Attack
Stop the enemy invasion which would lead to their strengthened defensive position in the South Pacific.
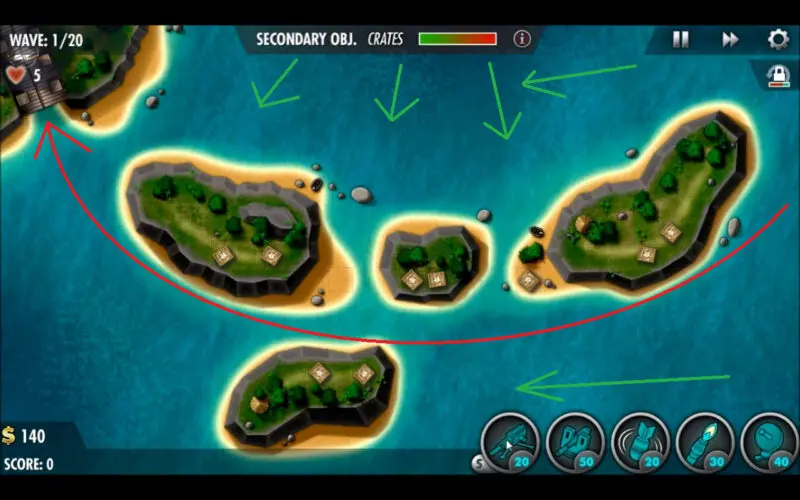
In Coral Sea, you will be facing 20 waves of enemy naval units, which mainly proceed along a single fixed path that makes a flattened-out U across the middle of the map. Sneak attacks will throw things around a bit, however, by coming in from almost every other direction except west. These sneak attacks can be made slightly less dangerous when you’re prepared with an adequate bomb supply.
Thanks to the poor terrain along the naval unit’s path, there really aren’t any great coverage spots for turrets to be placed. Combined with the limited income common in naval missions and the need for bomb turrets to deal with sneak attacks, you’ll be limited to entrenching a small portion of land right where the naval path becomes walled in by islands on both sides.
This guide will cover how to get a Full House, which is a perfect round with all medals and 20 victory points, on the Coral Sea level of the iBomber Defense Pacific campaign, played on Veteran difficulty. In addition, this mission guide will also cover the secondary objective and hidden target along with a walkthrough video.
Secondary Objective
Supplies have been scattered throughout the islands. Collect them all.
As mentioned above, a nice bomb supply is a necessity in this level. The majority of these crates will need to be collected with bombs, not only to keep defenses tight but also to actually clear room on certain spots that are better served with turrets. It’s definitely one of the most abundant crate levels thus far, meaning a hearty supply of income.
Supply Crates: 9
Victory Points So Far: 160
- Machine Gun lvl 3
X2 Power vs Flamed Specialization - Cannon lvl 3
- Bomb lvl 2
- Flamer lvl 3
- Comms lvl 3
Perks used for this mission:
- Greenback II
- Eagle Eye I
- Special Delivery
Since there will be a lot of crates in this level, Special Delivery is a natural pick. Eagle Eye and the now-unlocked Greenback II are just generally beneficial choices for this level.
Hidden Target
There are two small huts located on the series of island that make up the central majority of the map. The hut located on the top right larger island is your hidden target that you need to bomb in Coral Sea.

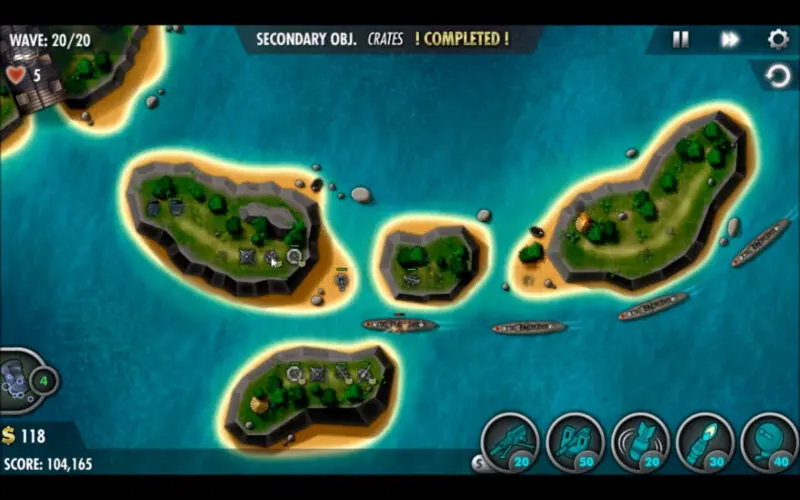
Turret Placement

Wave 10 turret placement in Coral Sea. Wave 20 turret placement.
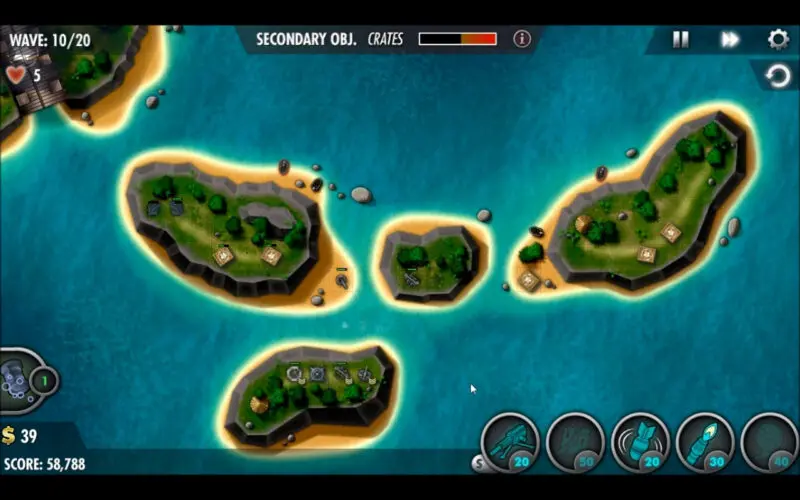
Specifically, this level should begin by placing a pair of Machine Guns on the two open spots on the southernmost island with a flamer placed on the sandy path on the island just north of them. Also, place a bomb turret on the far northwest end of the island closest to your base, out of harm’s way as much as possible. Use the turrets to clear out the crates to open up room for an eventual Comms and Cannon.
Bombs will probably be prioritized at first for some of the sneak attacks; however, hold off on taking out the patrol boats that show up right off the bat until their larger cruiser-sized brethren show up. Otherwise, use bombs to help clear the crates off the islands, starting with the islands to the left and wrapping up on the far right island. Towards the end of the level, work on upgrading that southern island while adding a similar row of Machine Gun, Cannon, and Comms to the top left island with a MG on the small one, and you should be pretty gravy.