Alligator Creek: Watchtower
Protect supply routes between the U.S., Australia and New Zealand by holding position in the Solomons.
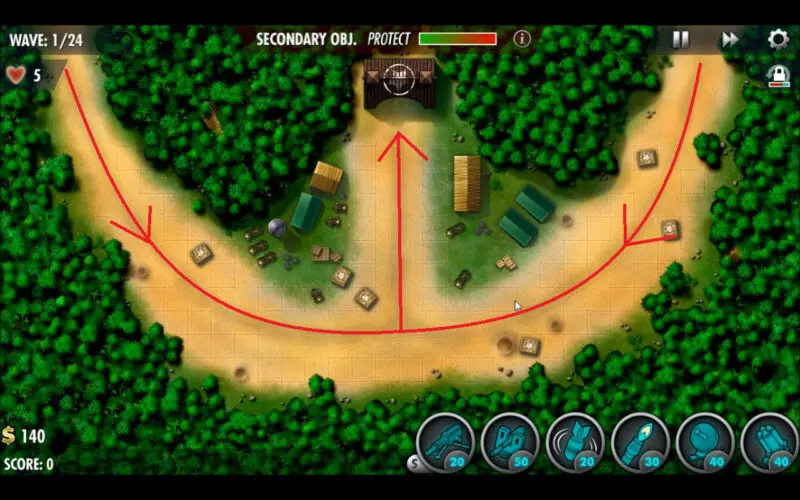
In Alligator Creek, you will be protecting your base at the top central path from a pair of ground paths that curve from either side in the shape of a W. Defense will focus on the converging point, and you’ll want to create a corridor of death that works effectively no matter which direction the enemy comes from.
This is an important early mission to take lessons from in terms of placing your turrets in the most cost-effective positions. Most turret defense games revolve heavily around managing a fixed income determined by the enemies that spawn on each map. Likewise, the health of attacking enemies and potential damage of the turrets you can use are also heavily calculated to make sure there lies a challenge in “puzzle solving” the underlying mathematical problems.
This guide will cover how to get a Full House, which is a perfect round with all medals and 20 victory points, on the Alligator Creek level of the iBomber Defense Pacific campaign, played on Veteran difficulty. In addition, this mission guide will also cover the secondary objective and hidden target along with a walkthrough video.
Secondary Objective
Protect your camp.
There are a series of buildings in the open grassland between your base and the spot of convergence that will need to be protected throughout the mission. Besides your internal corridor protecting the inner structures, a pair of MG turrets on either side of these structures will serve as efficient shields. (See pictures below for placement details.)
Supply Crates: 6
Victory Points So Far: 180 (20 unspent)
- Machine Gun lvl 3
X2 Power vs Flamed Specialization - Cannon lvl 3
- Bomb lvl 2
- Flamer lvl 3
- Comms lvl 3
Perks used for this mission:
- Greenback II
- Eagle Eye I
- Special Delivery
Early on in the game, our perk options are still limited, but the extra cash and better turrets you’ll be able to afford thanks to Greenback are almost never a bad option. The Bombardier perk gets left in the dust early into the game as perks like Eagle Eye become available, which is crucial for applying damage as soon as an enemy is in range thanks to the faster aiming bonus.
Hidden Target
The hidden target is another small hut in this level. It’s hidden along the right side of the map by the edge of the woods as the right enemy wave path curves.

Turret Placement

Wave 8 turret placement in Alligator Creek. Wave 16 turret placement.
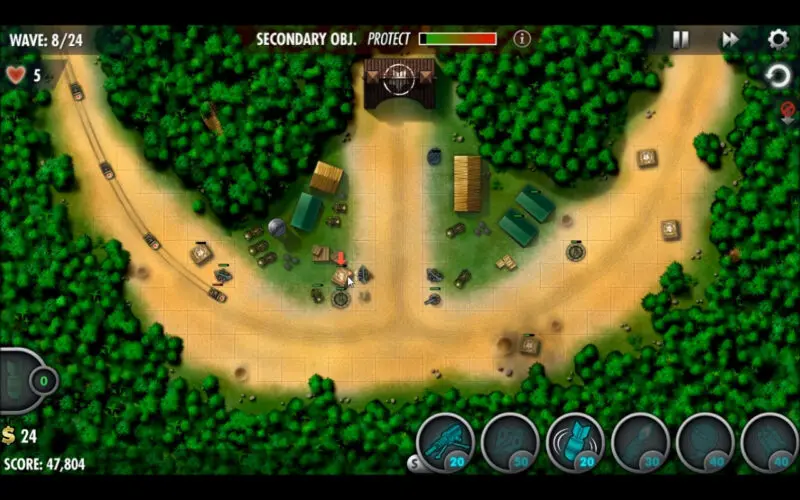

As mentioned above, turret placement will focus on a corridor of death along the two lines on either side of the converged path, plus the little stretch of land south of the meeting point of the two main paths in this map. One thing to be aware of is that later there will be a counterattack on this level, and so you should avoid building in the top 3 spots on either side of the converged path right by your base, except for the odd Bomb turret or two. (The reasons for this are covered in that mission’s guide.)
Besides placing a pair of Machine Guns, one on either side of the inside of the W prior to the convergence (so they protect the base for your secondary objective), build MGs, Cannons, and a couple Rocket Launchers around this central path. Place a single flamer turret on the corner of the meeting point to get yourself a great kill zone. Make sure to add Comms support with as strong a coverage as possible, and you’ll be doing fine.
