Operation Mai: Counterattack
Don’t let vital airstrips fall into enemy hands.
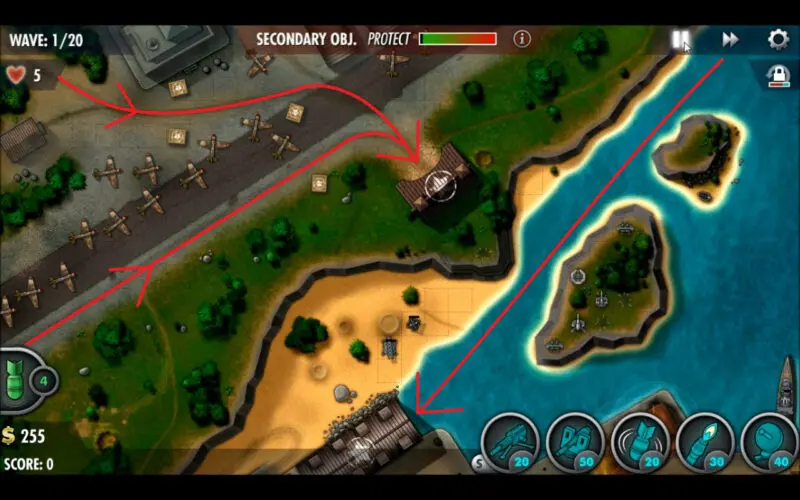
Operation Mai is the first counterattack mission in iBomber Defense Pacific‘s campaign, being quite similar to the previous game’s concept of returning to a previous battlefield for another round. In this level, you will return to Midway Atoll, except now you’re fighting enemies from both the ground and sea for 20 waves. The screen is offset from the previous time you were here, but the majority of your defenses will remain in the fight, starting you off strong.
Because of the way counterattacks work, it is important that you make sure you finish missions off as well as possible, since ending one on a bad foot can set you up to fail when you come back for the counterattack. This becomes especially important at later levels when the enemies you face become insanely strong and require heavy coordinated fire to down.
One thing that can be confusing (but is important to remember) is that you don’t always return to the most recent mission for a counterattack. Sometimes, like in this case, you are going back 2 or more levels from where you just were in the campaign.
This guide will cover how to get a Full House, which is a perfect round with all medals and 20 victory points, on the Operation Mai Counterattack level of the iBomber Defense Pacific campaign, played on Veteran difficulty. In addition, this mission guide will also cover the secondary objective and provide a walkthrough video.
Secondary Objective
Protect your planes.
There are several wings of fighter planes stationed on the ground on the left side of the map, along the paths of the enemy ground units. Through strategic turret placement, you will need to shield them from damage, along with being extra careful where you drop your bombs. It is only necessary to keep a handful or so alive, as there are plenty to be spared.
Supply Crates: 4
Victory Points So Far: 140
- Machine Gun lvl 3
X2 Power vs Flamed Specialization - Cannon lvl 3
- Bomb lvl 2
- Flamer lvl 2
- Comms lvl 3
Perks used for this mission:
- Greenback I
- Eagle Eye I
- Special Delivery
Special Delivery is probably the most potentially swappable, as Fast Fingers would be another excellent choice considering there are only 4 crates in this level; however, Eagle Eye is important for the quick moving between targets needed for when some of the sneak attacks show up. As always, Greenback is a pretty much necessary upgrade to make things easier on us, finances wise.
Hidden Target
There is no hidden target in Operation Mai. Since it is a counterattack mission, you technically already took care of the hidden target last time you were here. This is the same for all other counterattack missions.
Turret Placement

Wave 10 turret placement in Operation Mai. Wave 20 turret placement.
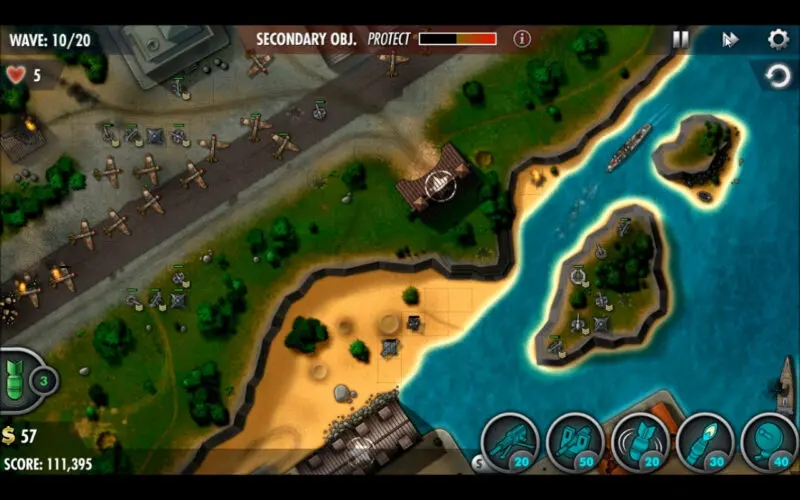
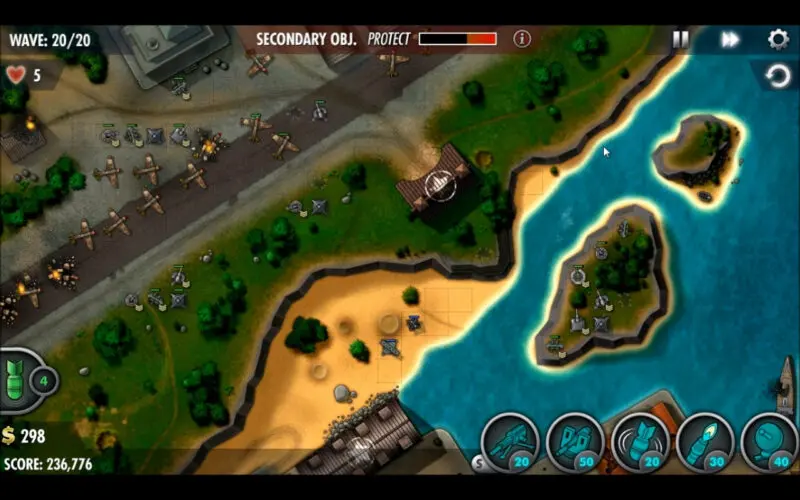
Turret placement here in Operation Mai will focus mostly on building up some substantial ground defense along the 2 ground wave lines while investing a slight amount into the island that covers the naval path. See the Midway Atoll guide linked above if you want to know more about the turrets that this level starts with, which are carried over from the end of that mission.
As seen in the two pictures above, there are 2 lines you want to make your ground turrets in, which helps provide a shield to protect the same lines of planes stationed around your base for the secondary objective. Bombs will be best held onto for when sneak attacks show up, as they come from many directions and quite often here. Finally try to accrue some heavy interest when possible as this level definitely presents some opportunities for such, which will subsequently bolster your defensive options.